Last updated on January 20th, 2024 at 07:55 am
Cake in Dutch oven brings baking to a fiery new level. There’s something magical about prepping sweet cake batter, and then nestling it into a thick-walled cast iron pot before sliding it into a blazing oven. The Dutch oven helps ensure perfectly even cooking, with the metal walls trapping moisture close to the cake as it bakes. While cakes baked in regular pans emerge tasty enough, using a Dutch oven takes things up a notch, helping cakes achieve supreme inner tenderness and a beautifully caramelised exterior.
Baking cakes in a Dutch oven scores points for presentation as well. When you lift the heavy lid and let guests peek in at the masterpiece within, their curiosity and appetite get stoked. Serving a gorgeous cake straight from the Dutch oven makes an incredibly satisfying dessert even more impressive and crave-worthy. The contrast of the rustic pot against the sweet elegance of the cake is a fabulous look for the table.
Cake in Dutch oven promises a memorable baking adventure with crowd-pleasing results. From setup to cleanup and every mouthwatering bite in between, this traditional cooking vessel gives “oven-fresh” a new meaning.
Today we will discuss three best Dutch oven cake recipe
How to Make Chocolate Cake in Dutch Oven
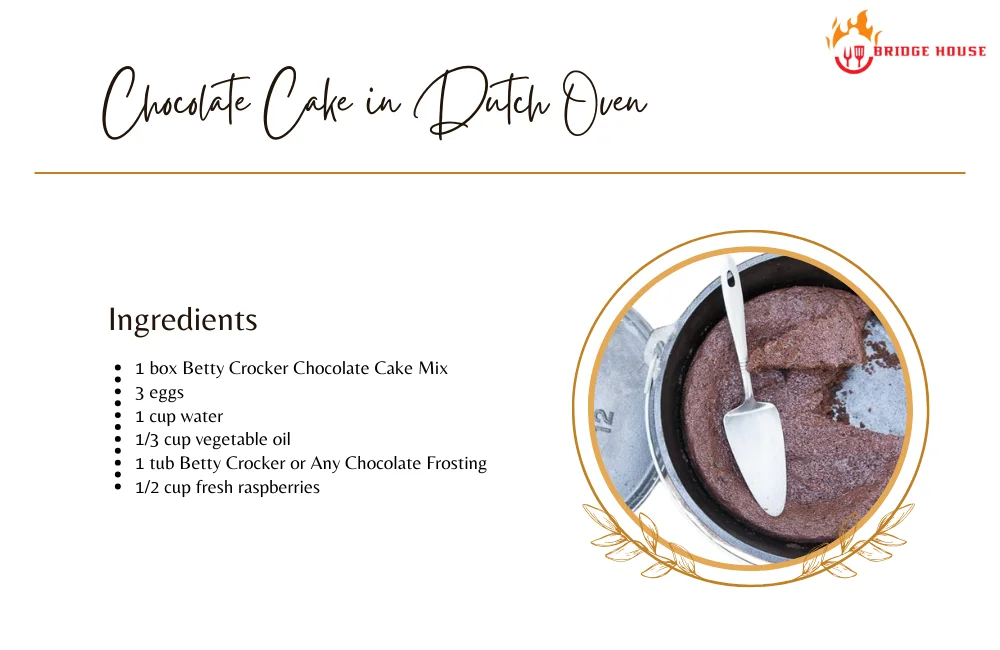
This chocolate cake in Dutch oven embraces a fudgy, magnificent dessert. Getting blended right in the Dutch oven, a silky chocolate cake batter bakes up extra moisture thanks to the cast iron interior distributing heat gently to the chocolate cake in a Dutch oven and locking in moisture.
Once cooled, the round chocolate cake layer baked in a Dutch oven gets cloaked in rich chocolate frosting and garnished with chocolate shavings to highlight its crumb. This simple yet scrumptious chocolate cake is easy to whip up for a crowd. For this delicious chocolate cake in Dutch Oven, we used a conventional oven to bake it but the recipe could easily be used while camping and made over the campfire.
Ingredients
- 1 box Betty Crocker Chocolate Cake Mix
- 3 eggs
- 1 cup water
- 1/3 cup vegetable oil
- 1 tub Betty Crocker or Any Chocolate Frosting
- 1/2 cup fresh raspberries
Getting Started
- Prepare your Dutch oven by lining the inside with parchment paper. This will make removing the finished cake a breeze.
- Preheat your oven to 350°F so it’s hot and ready to go.
Mixing and Baking
- In a spacious mixing bowl, thoroughly combine cake mix, water, eggs, and vegetable oil until a silky, fluid cake batter takes form.
- Carefully pour the smooth chocolate batter into the prepped Dutch oven, spreading evenly.
- Leave the lid off and bake for 40 minutes. The Dutch oven helps create a little oven within an oven to bake the cake flawlessly.
- Check for doneness by poking a toothpick into the middle – it should come out clean when the cake is ready.
Finishing Touches
- When the cake has completely cooled, liberally spread frosting over the top in an even layer for visual appeal.
- Adorn the frosted chocolate cake with fresh raspberries. Their tart sweetness perfectly balances the rich cake and frosting.
Serving
- Slice directly into the Dutch oven for a rustic presentation, or use the parchment paper to lift and plate the cake if desired.

Upside Down Pineapple Cake in Dutch Oven
This impressively delicious Upside Down Pineapple Cake in Dutch oven turns tradition on its head by baking fruit-side-down for a sweet surprise. Getting tucked into a preheated Dutch oven first, pineapple rings and maraschino cherries embed into a buttery brown sugar base before yellow cake batter pours over to bake up billowy and beautiful. The Dutch oven helps the pineapple cake in Dutch oven bake evenly while retaining moisture for a sublime crumb.
Once cooled, inverting the Dutch oven reveals the fruit layer becomes a glistening top crust. Slicing into the Upside Down Pineapple Cake in Dutch oven delights with ribbons of fruit swirling through pillowy cake layers for a tropical treat with a twist.
Ingredients
- 1/2 cup unsalted butter
- 1 cup brown sugar
- 10 ounces sliced pineapple
- Maraschino cherries halved
- 1 box yellow cake or vanilla cake mix (plus the required ingredients to make it)
Getting Started
- Preheat your Dutch oven to 325°F to get it hot for baking.
Building Flavor
- In the preheated Dutch oven, melt butter and mix in brown sugar until combined thoroughly. This will create a sweet and aromatic base layer.
- Arrange pineapple rings evenly over the brown sugar mixture in a single layer. Place a maraschino cherry neatly into the center of each ring.
Baking the Cake
- Make the cake batter according to the package directions. Evenly pour the batter over the pineapple layer in the Dutch oven.
- Bake the pineapple cake in Dutch oven at 325°F, checking after about 30 minutes. It’s finished when a knife inserted into the center comes out clean and the top springs back lightly when touched.
Flipping with Care
- After letting the cake rest for 5 minutes, place a large cutting board or plate atop the Dutch oven. Putting oven mitts on both hands, grasp the oven and plate firmly and invert it in one smooth motion so the cake releases onto your board or plate. Re-position any fruit that sticks.
Serving
- Slice into the warm Upside-down pineapple cake right away to serve so the fruit and sauce meld irresistibly into the tender cake.
Red Velvet Cake in Dutch Oven
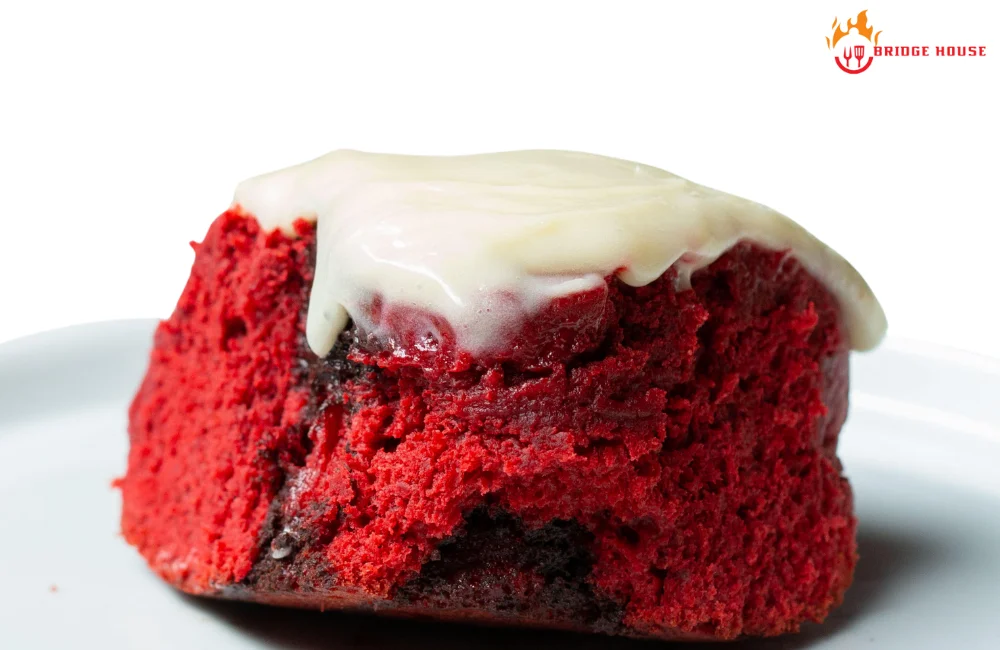
Baking up tall, tender, and tantalizing, this Red Velvet Cake in Dutch oven embraces the Dutch oven treatment to become the ultimate Southern dessert. Getting its scarlet color and subtle cocoa flavor from adding a homemade red paste to the cake batter, it bakes up extra moisture thanks to the Dutch oven’s heat distribution gently enveloping the cake in a Dutch oven and trapping in moisture.
Once cooled, the round red velvet cake layers baked in a Dutch oven get adorned with fluffy cream cheese frosting to showcase their crumb. Slicing into the two-layer red velvet cake in Dutch oven reveals its dense yet downy interior marked by an iconic white cream cheese frosting spiraling through. This cake brings complex flavors together into the perfect harmony only the Dutch oven environment can produce through even, gentle baking.
Ingredients
- 2 tablespoons red food coloring
- 1 tablespoon sweetened cocoa
- 1/2 cup Crisco
- 1 1/2 cups Sprinkles, powdered sugar, crushed nuts, etc.
- 2 large eggs
- 1 cup buttermilk
- 2 1/4 cups all-purpose flour
- 1/4 teaspoon salt
- 1 1/2 teaspoons vanilla extract
- 1 tablespoon white vinegar
- 1 teaspoon baking soda
Icing
- 5 tablespoons all-purpose flour
- 1 cup milk
- 1/2 stick butter softened
- 1/2 cup Crisco
- 1 cup sugar
Getting Started
- Preheat your oven to 350°F. Butter and flour two round 8 or 9-inch cake pans. This prevents sticking.
Mixing the Batters
- In a small bowl, blend the red food coloring and cocoa powder into a vivid red paste for coloring the cake.
- In a large bowl, beat together the Crisco, sugar, and eggs. Mix in the red paste until the batter is a bright, eye-catching red.
- Stir in the buttermilk evenly. Then slowly blend in the flour and salt so no lumps form.
- Make your chemical leaveners by combining vinegar, vanilla, and baking soda in a bowl. Mix this into the red velvet batter.
- Optional Tip: For extra moist cakes, stir a dollop of sour cream into the batter before baking.
Baking
- Divide the cake batter between the two prepared pans. Bake for about 30 minutes until a toothpick poked in the middle comes out clean.
Making the Icing
- While the red velvet cakes are baked in the oven, make the icing. Cook flour and milk in a saucepan over medium heat, stirring constantly, until very thick. Set aside to cool.
- Using an electric mixer, first beat the cooled mixture for 2 minutes. Then add the butter, shortening, and sugar and continue beating for 4 more minutes.
Finishing Touches
- Let the cakes cool completely before spreading icing over them.
- Double the icing to create lush layers between the cake rounds.
Conclusion
From easy crowd-pleasing chocolate cake in Dutch oven to more intermediate upside-down pineapple cake in Dutch oven and professional-quality red velvet cake in Dutch oven, the Dutch oven empowers home bakers to create cakes with an artisanal flair. Its thick walls promote gentle heat distribution while trapping moisture – keys for getting a tender crumb texture and caramelized exterior.
Whether following tried and true recipes or experimenting with new flavor combinations, the cake possibilities are endless with this versatile vessel. Beyond conventional oven methods, Dutch ovens can be fired up outdoors over coals for rustic campfire treats. Their timeless design allows cooking with several heat sources across generations. Part cooking equipment, part kitchen heirloom, Dutch ovens enable bakers to conjure up incredible desserts.
So next time a cake craving strikes, grab your Dutch oven and preheat the oven or prep the coals. This multitalented pot helps bakers channel their creativity into cakes with crackly sugary tops and deliciously moist interiors every time. With such ideal and consistent outcomes only a Dutch oven can reliably provide, baking cakes has never been more foolproof or fulfilling.

At Bridge House Tavern, we’re more than a team of food enthusiasts; we’re a culinary journey waiting to be savored. Our five-member crew is on a relentless quest to explore, create, and share the wonders of the gastronomic world.